
Set up Python, VSCode and Jupyter
A simple story on how to set up and automate a Python development setup, which includes:
- virtual environment creation
- automatic virtual environment activation
- exclude virtual environment from Git
- Jupyter installation and usage
For those that don’t have Python installed, please check https://www.python.org/downloads/ . To verify installation check the following.
But before we proceed on this journey, let’s take a look on the whys!
Why do we want to create a virtual environment?
Well, a virtual environment gives us the opportunity to separate the projects by it’s own requirements in our development machine, and even though we might start with only one, it won’t take long until we have a bunch of them.
Why do we want our virtual environment to be activated automatically?
Since our main goal is to develop code, it’s important to have a consistent environment, machine/os wise, so that we can focus on the main task. By using the same name for all environments, and keeping it under its related project, we minimise the chance of loading the wrong environment, we maximise the ease to search throughout the source code of a dependency and we can have a very similar setup for our favourite code editor.
Jupyter? I though we never went past the moon?
Jupyter is the evolution of ipython. And ipython is what, you might wonder? Well, ipython is an interactive console that allows you to run, test and discover your python code. How did Jupyter evolve? It works based on the concept of a notebook, which is a file that you can edit and share, but its greatness comes from the fact that we can replicate and share a test/experiment since we saved it in a notebook, otherwise it would be lost forever and we’d have to remember every single step we took.
Pip, Python package index
The python package manager, the thing that you’ll use to install, discover and control all the required packages of your project.
Python virtual environment creation
A typical python setup includes setting up an environment. To create one, run the code below according to the desired Python version, on the project folder.
or
This will create a folder called python-virtual-env, if one calls it python-virtual-env.
Python virtual environment activation
This feature doesn’t come by default, the main purpose is to activate it automatically once one enters the folder where the project is located.
For bash shell add the following to .bashrc
For zsh shell add the following to .zshrc
To activate the rc file run
or
Git, exclude the virtual environment folder
To do so, and to not pollute the project .gitignore file with your personal belongings, edit the Git exclude file.
By appending the following line:
VSCode, the editor
https://code.visualstudio.com/
Since every python project has an environment set under python-virtual-env, the following is a sample configuration that includes autocomplete and a linter. If you don’t use Django comment out the line that references it. Also, pay attention to the python version you’re using in that environment.
Jupyter
First we need to install Jupyter, run the code below with your active environment.
If everything was successful, a window has popped up on your browser. There you’ll see the folder of your project, or the root folder were you have ran Jupyter . If a window hasn’t popped, access the address on the end of the Jupyter log.
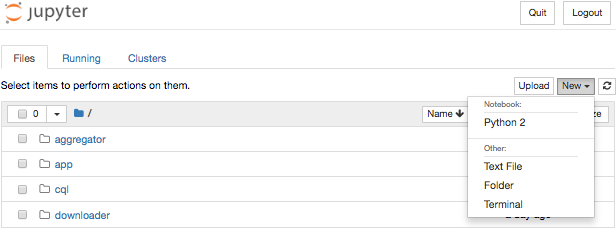
On the right upper corner, there’s a button with the label New. Click it! On the dropdown menu, under notebook there is a Python 2 or Python 3.7 depending on what version of python your project is using. Click it
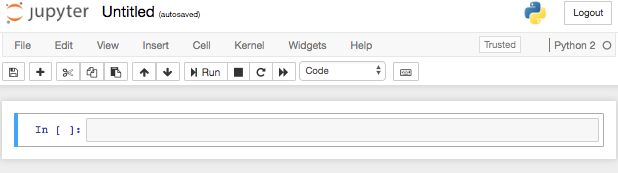
Et voilà! An interactive notebook that lets you save all the recipes, that otherwise would have a lifetime of a lit match.
At Runtime Revolution we take our craft seriously and always go the extra mile to deliver a reliable, maintainable and testable product. Do you have a project to move forward or a product you’d like to launch? We would love to help you!