
A little bit of context
Among the many ways to create Single Page Apps (SPAs), one of them usually involves developing a back-end API to provide data and a front-end app that can consume said data and show it to the user.
In order to send and/or receive this data, the two apps have to be in communication with each other, and in most cases, this is done through the use of HTTP requests and responses.
To perform HTTP requests, front-end apps usually use tools like FetchAPI or Axios, which provide an interface to create the requests and send them over to the back-end.
On the other side, the back-end API will receive many of these requests and will have to handle each one of them, assuming there are no other security protocols in play here. That being said, speaking of extra layers of security, usually, these APIs offer both “public” and “private” (in other words, authenticated) endpoints. The latter are not useable unless front-end clients provide some kind of credentials, through the use of HTTP request headers. In more simpler terms, users of the front-end app will first have to perform a sign-in through a public endpoint, in order to use the remaining private endpoints.
This brings me to the context of this blog post. Here I will be presenting one (of many) ways to perform this communication between two apps:
- a back-end Ruby-on-Rails JSON API
- and a front-end React Typescript app
Additionally, I will provide my personal view on how to organize the code on the front end, so as to be able to call API endpoints with ease, as well as talk about some security concerns to have in mind when building these types of apps.
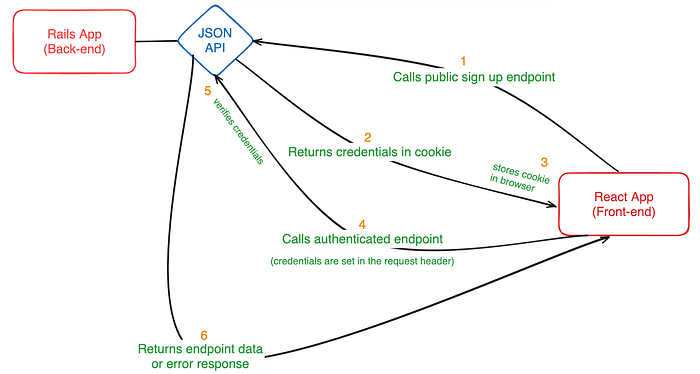
Now, before we move ahead, here’s a quick graphic showing the communication process that I will be explaining later in this post:
Baby steps
First of all, I would like to put up a disclaimer right now that I won’t be going into the details of setting up either of the apps. There are plenty of guides and tutorials explaining how to do that, for both React and Ruby-on-Rails.
Now that we’ve gotten that out of the way, let’s start configuring the back-end API first. In this case, I will be using devise and devise-jwt gems to set up the sign-up and authentication processes, since they provide both of these pretty much out-of-the-box.
After setting up the default configurations that Devise provides (you can follow the Devise gem link above to know how to set these up), we will be adding a little bit of code to the config/initializers/devise.rb file that you should already have in your app:
Devise.setup do |config|
  ...
  config.jwt do |jwt|
    jwt.secret = ENV.fetch("JWT_SECRET_KEY")
    jwt.dispatch_requests = [
      ["POST", %r{^/login$}]
    ]
    jwt.revocation_requests = [
      ["DELETE", %r{^/logout$}]
    ]
    jwt.expiration_time = 2.weeks.to_i
  end
end
Once you’ve added the bit of code above, install the rack-cors gem if you haven’t yet, and create the following config file on this location: config/initializers/cors.rb. Afterward, add the following code to make sure you expose the header that will contain the authentication credentials:
Rails.application.config.middleware.insert_before 0, Rack::Cors do
  allow do
    origins "*" # you can specify custom origins, to minimize CORS issues
    resource "*",
    headers: :any,
    expose: ["Authorization"], # this is the header to be included in requests
    methods: [:get, :post, :put, :patch, :delete, :options, :head]
  end
end
Moreover, since we’re using Devise’s base controllers, let’s go ahead and create/edit the controllers/users/sessions_controller.rb, which handles the “sign-in” process, and adds the following methods:
module Users
  class SessionsController < Devise::SessionsController
    respond_to :json

    private

    def respond_with(resource, _opts = {})
      if resource.present?
        # Login success
        render json: {
          data: resource.to_h,
          message: "Logged in successfully!"
        }, status: :ok
      else
        # Failed to login
        render json: {
          message: "Invalid email or password."
        }, status: :ok
      end
    end

    def respond_to_on_destroy
      if current_user
        # Logout success
        render json: {
          message: "Logged out successfully!"
        }, status: :ok
      else
        # User was not logged in
        render json: {
          message: "There is no active session."
        }, status: :unauthorized
      end
    end
  end
end
These two methods override the default response, in order to return data with a common format that the front end will later use.
Now let’s do a similar thing for the controller that handles the “sign up” process, controllers/users/registrations_controller.rb:
module Users
  class RegistrationsController < Devise::RegistrationsController
    respond_to :json

    private

    def respond_with(resource, _opts = {})
      if resource.persisted?
        render json: {
          data: resource.to_h,
          message: "Account created successfully!"
        }, status: :ok
      else
        render json: {
          message: "An error occurred while creating your account. Please try again!",
          errors: resource.errors.full_messages
        }, status: :unprocessable_entity
      end
    end
  end
end
Alright, this should take care of customizing the authentication process. In any case, I’ll leave here a quick snippet of an example configuration for the User model with basic Devise settings, such as:
devise :database_authenticatable, :registerable,
       :recoverable, :rememberable, :validatable,
       # These two options below will make sure that the user will be
       # authenticated via the use of a JWT token, and that there will be
       # a token revocation process, to expire old tokens
       :jwt_authenticatable, jwt_revocation_strategy: JwtDenylist
Creating some routes
Since everything should now be correctly set up and ready to be used, let’s go ahead and create some routes for endpoints that we will be calling via the React app later on.
For the purpose of this post, I’ve added these three routes below:
namespace :api, defaults: { format: :json } do
    namespace :v1 do
      # Public endpoints
      get "hello", to: "hello_world#hello"

      # Private endpoints
      get "current_user", to: "current_user#show"
      get "secret", to: "top_secret#secret"
    end
  end
The public endpoint /hello will require no authentication and will print out a string saying “Hello, world!”, while the remaining two endpoints, /current_user and /secret, will require a valid JWT Authorization token passed in the request header, before replying back with their contents.
For simplicity’s sake, when creating these three new controllers, I’ve added a top-level controller with a shared rendering method. Let’s call it RootController:
module Api
  module V1
    class RootController < ApplicationController
      def render_json(data: {}, message: nil, errors: nil, status: :ok)
        render json: { data:, message:, errors: }, status:
      end
    end
  end
end
This will ensure that the data is always sent back to the front-end app with the same format.
Moving over, as you can imagine, little needs to be done in terms of the public endpoint. We just need to define the method in the controller and print out the string I mentioned earlier:
module Api
  module V1
    class HelloWorldController < RootController
      def hello
        render_json message: "Hello, world!"
      end
    end
  end
end
However, it’s not like the private endpoints are too complicated either. We just need to set up a quick authentication check on a before_action callback, which Devise already provides us!
module Api
  module V1
    class TopSecretController < RootController
      # this is the callback that devise provides out-of-the-box
      # it will check for the Authorization token in the request headers
      # and validate it to make sure it is not a malicious request
      before_action :authenticate_user!

      def secret
        render_json message: "Shh, this is a secret!"
      end
    end
  end
end
Lastly, much like in the controller shown above, the /current_user endpoint will also make use of this callback, so as to only return the user information, if the user is authenticated.
module Api
  module V1
    class CurrentUserController < RootController
      before_action :authenticate_user!

      def show
        return render_json data: current_user.to_h if current_user.present?

        render_json message: "Uh oh, something weird occurred",
                    status: :unauthorized
      end
    end
  end
end
Setting up the building blocks for the React app
Now that the Rails back-end is all taken care of, let’s move on to the more interesting part (not biased at all) of organizing the front-end code to make sure the API calls are easy to make and handle.
Let’s start by setting up our React entry point with a router provider, configured with the react-router-dom package. Our router will only have one path, but there are some neat things you can do in terms of authentication, using the router. I’ll go deeper into those details at the end of this post.
const router = createBrowserRouter([
  {
    element: <AppLayout />,
    children: [
      {
        path: '/',
        element: <Home />,
      }
    ]
  }
]);

ReactDOM.createRoot(document.getElementById('root')!).render(
  <StrictMode>
    <RouterProvider router={router} />
  </StrictMode>,
);
The AppLayout component will be used to share some context with all the routes in the front-end app (of which there is only one here, but you will most likely have more when building your own), and the Home one where we’ll render the only page our app has. Consequently, the layout component will wrap a CurrentUserProvider component, which will provide access to the “current user” info everywhere in the app. The layout is simple enough:
const AppLayout = () => {
  return (
    <CurrentUserProvider>
      <Outlet />
    </CurrentUserProvider>
  );
};
…and the provider component can be defined as follows:
import Cookies from 'js-cookie';
import React, { createContext, useCallback, useEffect, useState } from 'react';

type CurrentUser = {
  id: string;
  email: string;
};

export interface CurrentUserContextProps {
  currentUser?: CurrentUser;
  loading: boolean;
  signIn: (email: string, password: string) => Promise<boolean>;
  signOut: () => Promise<boolean>;
}

// CurrentUser Context with default values
export const CurrentUserContext = createContext<CurrentUserContextProps>({
  currentUser: undefined,
  loading: false,
  signIn: async (_email, _password) => {
    console.warn('Sign in not yet defined');
    return false;
  },
  signOut: async () => {
    console.warn('Sign out not yet defined');
    return false;
  }
});

export const CurrentUserProvider: React.FC<{ children: React.ReactNode }> = ({children}) => {
  // Store the user info
  const [currentUser, setCurrentUser] = useState<CurrentUser>();
  // Keep a loading state to know when we've got the data
  const [loading, setLoading] = useState(true);

  const signIn = useCallback(async (email: string, password: string) => {
    // TODO: Callback that will send a login request to the API
  }, []);

  const signOut = useCallback(async () => {
    // TODO: Callback that will send a logout request to the API
  }, []);

  const getUserInfo = useCallback(async () => {
    // TODO: Callback that will retrieve user info based on existing credentials
  }, []);

  useEffect(() => {
    // Fetch current user info if we have already credentials stored
    if (Cookies.get('Authorization')) getUserInfo();
  }, []);

  return (
    <CurrentUserContext.Provider value={{ currentUser, loading, signIn, signOut }}>
      {children}
    </CurrentUserContext.Provider>
  );
}
We’ll come back to define those “TODOS”, but first let’s tidy up the API handlers. Time to set up a few helpful constants.
import queryString from 'query-string';

const API_V1 = 'v1';
const AUTH_TOKEN_COOKIE = 'Authorization';

const API_STATUS = {
  OK: 200,
  NO_CONTENT: 204,
  NOT_MODIFIED: 304,
  BAD_REQUEST: 400,
  UNAUTHORIZED: 401,
  FORBIDDEN: 403,
  NOT_FOUND: 404,
  UNAVAILABLE: 410,
  INTERNAL_SERVER_ERROR: 500,
};

const API_GET = Symbol('API Read');
const API_POST = Symbol('API Create');
const API_PUT = Symbol('API Update');
const API_PATCH = Symbol('API Patch');
const API_DELETE = Symbol('API Delete');

const ACCEPTED_METHODS = {
  [API_GET]: 'GET',
  [API_POST]: 'POST',
  [API_PUT]: 'PUT',
  [API_PATCH]: 'PATCH',
  [API_DELETE]: 'DELETE',
}

type ApiCallParams = {
  method: keyof typeof ACCEPTED_METHODS;
  endpoint: string;
  headers?: Record<string, any>;
  queryParams?: Record<string, any>;
  body?: Record<string, any>;
  apiVersion?: typeof API_V1;
};

type GetFullUrlParams = {
  endpoint: string;
  queryParams?: Record<string, any>;
  apiVersion?: typeof API_V1;
};

const stringifyQueryParams = (params: Record<string, any>) => queryString.stringify(params);

const isAbsoluteUrl = (pathname: string) => {
  const isAbsoluteUrlRegex = /^(?:[a-z]+:)?\/\//i;
  return isAbsoluteUrlRegex.test(pathname);
};

// Utility to build our API endpoint URLs
const getFullApiUrl = ({
  endpoint,
  queryParams = {},
  apiVersion = API_V1,
}: GetFullUrlParams) => {
  let fullUrl;

  if (isAbsoluteUrl(endpoint)) {
    fullUrl = new URL(endpoint);
  }
  else {
    // API_URL is an env variable, make sure to set yours correctly
    const apiUrl = new URL(process.env.API_URL);
    const stringParams = isEmpty(queryParams) ? '' : `?${stringifyQueryParams(queryParams)}`;
    fullUrl = new URL(`${apiUrl.origin}/api/${apiVersion}/${endpoint}${stringParams}`);
  }
  return fullUrl;
};
Alright, this should be enough so that we can now build our own custom request handler on top of the browser's native FetchAPI.
Moving on, we have a few more helper methods we need to define in order to handle authentication credentials. For this, we’ll also be using another package called js-cookie, to better manage existing cookies. Let’s take a look at these new method implementations:
import Cookies from 'js-cookie';

const tryPersistCredentials = (resp: Response) => {
  try {
    const authToken = resp.headers.get(AUTH_TOKEN_COOKIE);
    if (authToken) {
      Cookies.set(AUTH_TOKEN_COOKIE, authToken, { path: '/' });
    }
  } catch (err) {
    // you can do whatever you want with the error here,
    // but in terms of credentials we don't need to do anything else
  }
};

const getCredentials = () => {
  const authToken = Cookies.get(AUTH_TOKEN_COOKIE);
  return authToken;
};

const removeCredentials = () => {
  Cookies.remove(AUTH_TOKEN_COOKIE, { path: '/' });
}
Last but not least, let’s define our fetch API wrapper function with the help of everything we have just implemented!
export function apiCall({
  method,
  endpoint,
  queryParams = {},
  body = {},
  headers = {},
  apiVersion = API_V1,
}: ApiCallParams) {
  const httpMethod = ACCEPTED_METHODS[method];
  const fullUrl = getFullApiUrl({
    endpoint,
    apiVersion,
    queryParams,
  });

  // Our API is JSON, so we need a few basic headers on our requests
  let finalHeaders: HeadersInit = {
    ...headers,
    Accept: 'application/json',
    'Content-Type': 'application/json',
  };

  // Here we will try to retrieve existing credentials
  // and pass them through the headers
  const authToken = getCredentials();
  if (authToken) {
    finalHeaders = {
      ...finalHeaders,
      Authorization: authToken,
    }
  }

  // Finally, we'll make the HTTP request using fetchAPI
  return fetch(fullUrl, {
    method: httpMethod,
    headers: finalHeaders,
    body: method === API_POST ? JSON.stringify(body) : undefined,
  }).then((response: Response) => handleApiResponse(response, endpoint))
}
…and that’s it!
Wait, is this really it?
No, of course not! You’d think I’d forget to mention the most crucial part of handling the API responses. Here is the implementation of the handleApiResponse function:
const handleApiResponse = async (response: Response, endpoint: string) => {
  if (!response.ok) {
    if (response.status === API_STATUS.UNAUTHORIZED) removeCredentials();
    return { result: Promise.reject(response), success: false };
  }

  if (endpoint.includes('logout')) removeCredentials();
  else tryPersistCredentials(response);

  const responseJson = await response.json();
  return {result: responseJson, success: true};
};
As you can see, every time we get a response back from the API, we’ll look at its status and decide what to do with the credentials. For the logout endpoint specifically, we’ll be removing the stored credentials, while for everything else we’ll try to persist them, assuming the API sends them through the response headers. In the end, every API request will be formatted the same way, for ease of use across the rest of the app.
The final stretch
Since we now have all the power in our hands to make API calls, let’s quickly define an endpoint dictionary, that we’ll call “API”, which helps us organize the code and easily access all endpoints from anywhere, with a single import.
export const API = {
  Login: async (email: string, password: string) => apiCall({
    method: API_POST,
    endpoint: 'login',
    body: { user: { email, password } },
  }),
  Logout: async () => apiCall({
    method: API_DELETE,
    endpoint: 'logout',
  }),
  GetCurrentUser: async () => apiCall({
    method: API_GET,
    endpoint: 'current_user'
  }),
  GetHello: async () => apiCall({
    method: API_GET,
    endpoint: 'hello'
  }),
  GetSecret: async () => apiCall({
    method: API_GET,
    endpoint: 'secret'
  })
};
These are all the endpoints we’ll be using for this post, and each one corresponds to a route we defined earlier on the Rails app.
As you can see, everything is abstract enough right now that we can define new endpoints quite easily, since the underlying mechanism works for any new one we might need.
Alright, let’s get back to the CurrentUserProvider component and set up the callbacks we left unfinished!
const signIn = useCallback(async (email: string, password: string) => {
  // while we perform the API call, we can set the loading state to true
  // and once we get our response, we can set it back to false,
  // no matter the response
  setLoading(true);
  const resp = await API.Login(email, password)
    .finally(() => setLoading(false));

  if (resp.success) {
    // If the login was successful, we store the user data on our state
    setCurrentUser(resp.result.data);
    return true;
  }
  return false;
}, []);

const signOut = useCallback(async () => {
  const resp = await API.Logout();

  if (resp.success) {
    // If the logout was successful, we remove the current user data
    setCurrentUser(undefined);
    return true;
  }
  return false;
}, []);

const getUserInfo = useCallback(async () => {
  setLoading(true);
  const resp = await API.GetCurrentUser()
    .finally(() => setLoading(false));

  if (resp.success) {
    // If the existing credentials proved to be valid,
    // we store the user data the same way we do for the login
    setCurrentUser(resp.result.data);
  }
}, []);
You may have noticed that, apart from the getUserInfo callback, the others return a boolean. That’s because it might be helpful to understand if the request was successful or not, while not needing to return the whole response info. But you are free to return any type of information you require!
Lastly, we just need to set up our home page, where we’ll mash everything together and let the user perform our sample API calls. I won’t go into a lot of detail, so here’s the code I ended up with for the Home component we set up earlier on our router:
export const Home = () => {
  // This is just a way to store a sample message received from the API
  const [contents, setContents] = useState('');
  // These two are for handling loading and error states
  const [isError, setIsError] = useState(false);
  const [loading, setLoading] = useState(false);

  // Callback to handle resetting the home page states when necessary
  const clearContents = useCallback(() => {
    setIsError(false);
    setContents('');
  }, []);

  // Similar to the CurrentUserProvider, we set up some callbacks
  // to make the API calls to either public or private endpoints

  // This callback will "usually" always be successful,
  // but I've set some error handling just in case anyways
  const tryGetHello = useCallback(async () => {
    setLoading(true);
    clearContents();
    await API.GetHello().then((resp) => {
      setLoading(false);
      if (resp.success) setContents(resp.result.message);
      else {
        // based on our API configuration this else branch should never happen
        setIsError(true);
        setContents('It\'s a sad world...');
      }
    });
  }, []);

  // This callback will always fail unless we have valid credentials stored
  const tryGetSecret = useCallback(async () => {
    setLoading(true);
    clearContents();
    await API.GetSecret().then((resp) => {
      setLoading(false);
      if (resp.success) setContents(resp.result.message);
      else {
        setIsError(true);
        setContents(`Nice try, but no.`)
      }
    });
  }, []);

  // And here is the layout of the home page, with some CSS to lighten up the mood
  return (
    <div className={styles.home}>
      <div className={styles.home__header}>
        <AuthForm />
      </div>

      <h2>React to Rails API Data Security</h2>

      <div className={styles.home__links}>
        <button type="button" onClick={tryGetHello}>Hello!</button>
        <button type="button" onClick={tryGetSecret}>View secrets</button>
      </div>

      <div className={styles.home__treasureBox}>
        {loading && <span className={styles.contentMessage}>Loading . . .</span>}
        {contents && (
          <span className={classNames(styles.contentMessage, {[styles['contentMessage--error']]: isError})}>
            {contents}
          </span>
        )}
      </div>
    </div>
  );
};
The AuthForm component is just a simple form with email and password input fields, to be able to log in. I used react-hook-form to implement that part, but there are a few other options if you cannot use this package (look up Formik, Tanstack Form, or React Final Form). In terms of CSS, I set up this app with Vite and CSSModules, but there are many other options, from pure CSS to “styled-components” aka “css-in-js”.
As a sneak peek, here’s how my implementation of the home page ended up looking like:
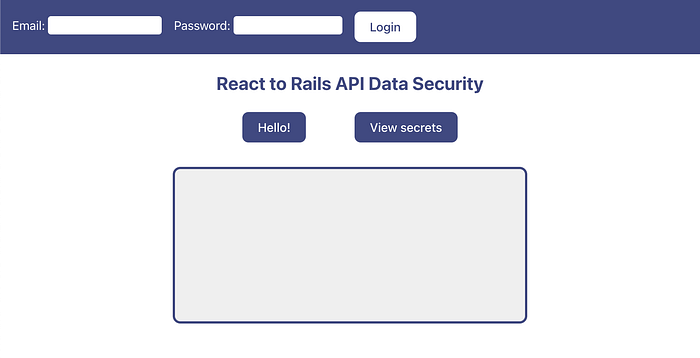
As you can see, we have access to two buttons: “Hello!” and “View secrets” that will each respectively call a public and private endpoint. In the big text box below, you will be able to view the resulting message of said calls.
Final thoughts
I hope you enjoyed the contents of this blog post and were able to learn something new! Nevertheless, there are a few things that I did not mention before which I think are important too!
- In my provided example, I only made use of JWT tokens and Cookies, but there are other equivalent ways to handle authentication and storing credentials, some more secure than others. Try to always keep sensitive information stored securely, since it might be prone to Cross-Site Scripting (XSS) attacks.
- There are some cool things you can do with “React router”, once you have authentication and credentials management set up in your app. For example, you can define different layouts with different levels of permissions, wrapped around your different routes. See below:
// Extended router for the sample app from this post
const router = createBrowserRouter([
  {
    element: <AppLayout />,
    children: [
      {
        path: '/',
        element: <Home />,
      },
      {
        element: <PublicLayout />,
        children: [
          {
            path: '/hello-world',
            element: <HelloWorld />
          }
        ]
      },
      {
        element: <PrivateLayout />,
        children: [
          {
            path: '/top-secret',
            element: <TopSecret />
          }
        ]
      }
    ]
  }
]);

export const PublicLayout = () => {
  return (
    <div className={styles.publicLayout}>
      <h2>PUBLIC</h2>
      <Outlet />
    </div>
  );
};

export const PrivateLayout = () => {
  const { currentUser, loading } = useCurrentUser();
  const navigate = useNavigate();

  useEffect(() => {
    if (!loading && !currentUser) {
      navigate('/', { replace: true });
    }
  }, [loading, currentUser]);

  return currentUser && (
    <div className={styles.privateLayout}>
      <h2>PRIVATE</h2>
      <Outlet />
    </div>
  );
};
The public layout will render anything below it in the hierarchy, while the private one will only render stuff if there is a user currently logged in. With that said, if the permissions were a little more complex, you can always add more constraints to these layouts as necessary.
That’s it! If you’ve reached this far, thank you for reading and I will see you in the next post!
I work as a full-stack developer at Runtime Revolution, where we focus on developing the best solutions for our client’s problems.
I’m also a bit of a computer geek and game “aficionado”, both of which lead me to read and be up-to-date with the latest news in the worlds of technology and gaming.