
Those who tried development in React Native a couple of years ago know how cumbersome it can be to install applications like Android Studio and Xcode. Expo bypasses all of that. This article explores how to use Expo to develop applications in React Native, from installation to deployment and publishing.
What is Expo?
Expo is a platform and set of tools for developing mobile applications using React Native. It provides a series of libraries and services that simplify application creation, building, and deployment. Expo is especially useful for beginners due to its simplicity, but it also offers powerful features for experienced developers.
Why Use Expo?
- Easy Setup: With Expo, you can start a new project in minutes without the need to configure native tools.
- Hot Reloading: Allows you to see code changes in real-time without the need to recompile the app.
- Access to Native Features: Expo provides application programming interfaces (APIs) access to native device features such as camera, location, and notifications.
- Optimized Builds: The platform offers integrated tools to create simplified production builds for Android and iOS.
Getting Started with Expo
The Expo documentation is easy to follow:
Get started creating apps with Expo.
In a nutshel
To get started you will need 2 things:
- Install Expo in your local environment.
- Download the Expo Go app onto your mobile device.
Coding Time
Setup your local environment (please update your node version first)
This set of commands creates an application from a template. This generates a set of screens to play with.
npx create-expo-app@latest
npx expo start
Notice that this produces a QR Code in the bash (bourne-again shell), like this one:
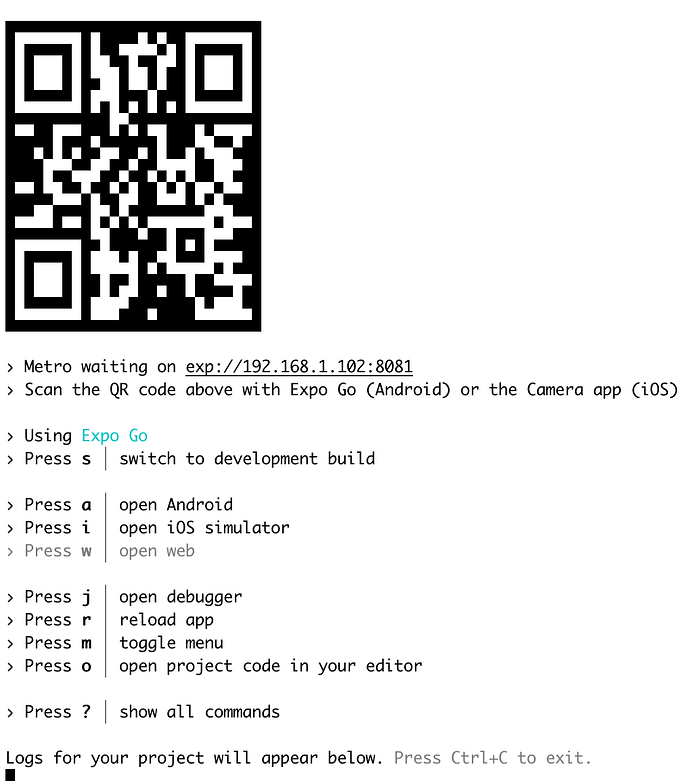
After downloading the Expo Go app to a mobile device, open it and click the “Scan QR Code” option. The React Native app should now be running on the mobile device.
Going back to the local development folder and changing something in the index.js page will trigger a hot reload.
Now it’s simple React Native development. Note: added packages must be compliant with Expo. However, Expo provides the most needed standard packages.
Publishing to the Stores
There are two ways:
- Extract the app from Expo and build locally — This option is without Expo. This means developers can use Expo in their development, but it is not mandatory for publishing. Developers can build it locally and submit it to the stores as normal.
- Use Expo Application Services — Enterprise Application Software (EAS) makes things easier. It allows developers to run staging and QA environments on Expo servers. This means an app will run remotely in the cloud instead of locally (by running the npx expo start command). This way, developers can send a link to anyone to test the app — after downloading the Expo Go app. The app offers a “freemium” pricing structure — running EAS often will incur charges. However, the free tier is ideal for developers looking to determine how well the app suits their needs. For more info, click the following link: Expo Application Services.
Conclusion
Expo is a powerful tool that simplifies the development of mobile applications with React Native. With its easy setup, accessible APIs, and integrated build tools, developers can focus more on developing features and less on environment configuration. Try Expo on your next project to see how it accelerates workflow.